ConstraintLayout Animation 101
Mar 28, 2021

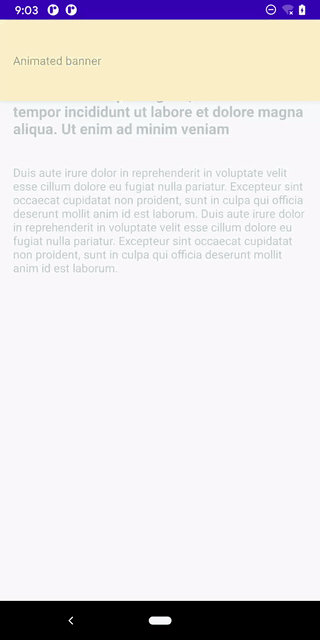
Here is a quick example of animating in ConstraintLayout. Let’s say you need to animate a yellow banner up and off the screen like so:
There are a few ways to accomplish it including ObjectAnimator. Here we will cover the ConstraintLayout animation way—arguably an overkill in this particular case. As soon as the number of views being animated increases, this starts to make more sense.
<androidx.constraintlayout.widget.ConstraintLayout xmlns:android="http://schemas.android.com/apk/res/android"
    xmlns:app="http://schemas.android.com/apk/res-auto"
    xmlns:tools="http://schemas.android.com/tools"
    android:id="@+id/constraintLayout"
    android:layout_width="match_parent"
    android:layout_height="match_parent"
    android:background="#EFF7F8"
    tools:context=".ui.main.MainFragment">

    <androidx.cardview.widget.CardView
        android:id="@+id/animatedBanner"
        android:layout_width="match_parent"
        android:layout_height="100dp"
        app:cardBackgroundColor="#F8DE7E"
        app:cardElevation="6dp"
        app:layout_constraintEnd_toEndOf="parent"
        app:layout_constraintStart_toStartOf="parent"
        app:layout_constraintTop_toTopOf="parent">

        <TextView
            android:layout_width="wrap_content"
            android:layout_height="wrap_content"
            android:layout_gravity="center_vertical"
            android:layout_marginStart="16dp"
            android:text="@string/banner_text"
            android:textColor="#0F0F0F" />

    </androidx.cardview.widget.CardView>

    <TextView
        android:id="@+id/text1"
        android:layout_width="match_parent"
        android:layout_height="wrap_content"
        android:layout_marginStart="16dp"
        android:layout_marginTop="16dp"
        android:layout_marginEnd="16dp"
        android:text="@string/other_text1"
        android:textSize="18sp"
        android:textStyle="bold"
        app:layout_constraintEnd_toEndOf="parent"
        app:layout_constraintStart_toStartOf="parent"
        app:layout_constraintTop_toTopOf="parent" />

    <TextView
        android:id="@+id/text2"
        android:layout_width="match_parent"
        android:layout_height="wrap_content"
        android:layout_marginStart="16dp"
        android:layout_marginTop="32dp"
        android:layout_marginEnd="16dp"
        android:text="@string/other_text2"
        app:layout_constraintEnd_toEndOf="parent"
        app:layout_constraintStart_toStartOf="parent"
        app:layout_constraintTop_toBottomOf="@id/text1" />

</androidx.constraintlayout.widget.ConstraintLayout>

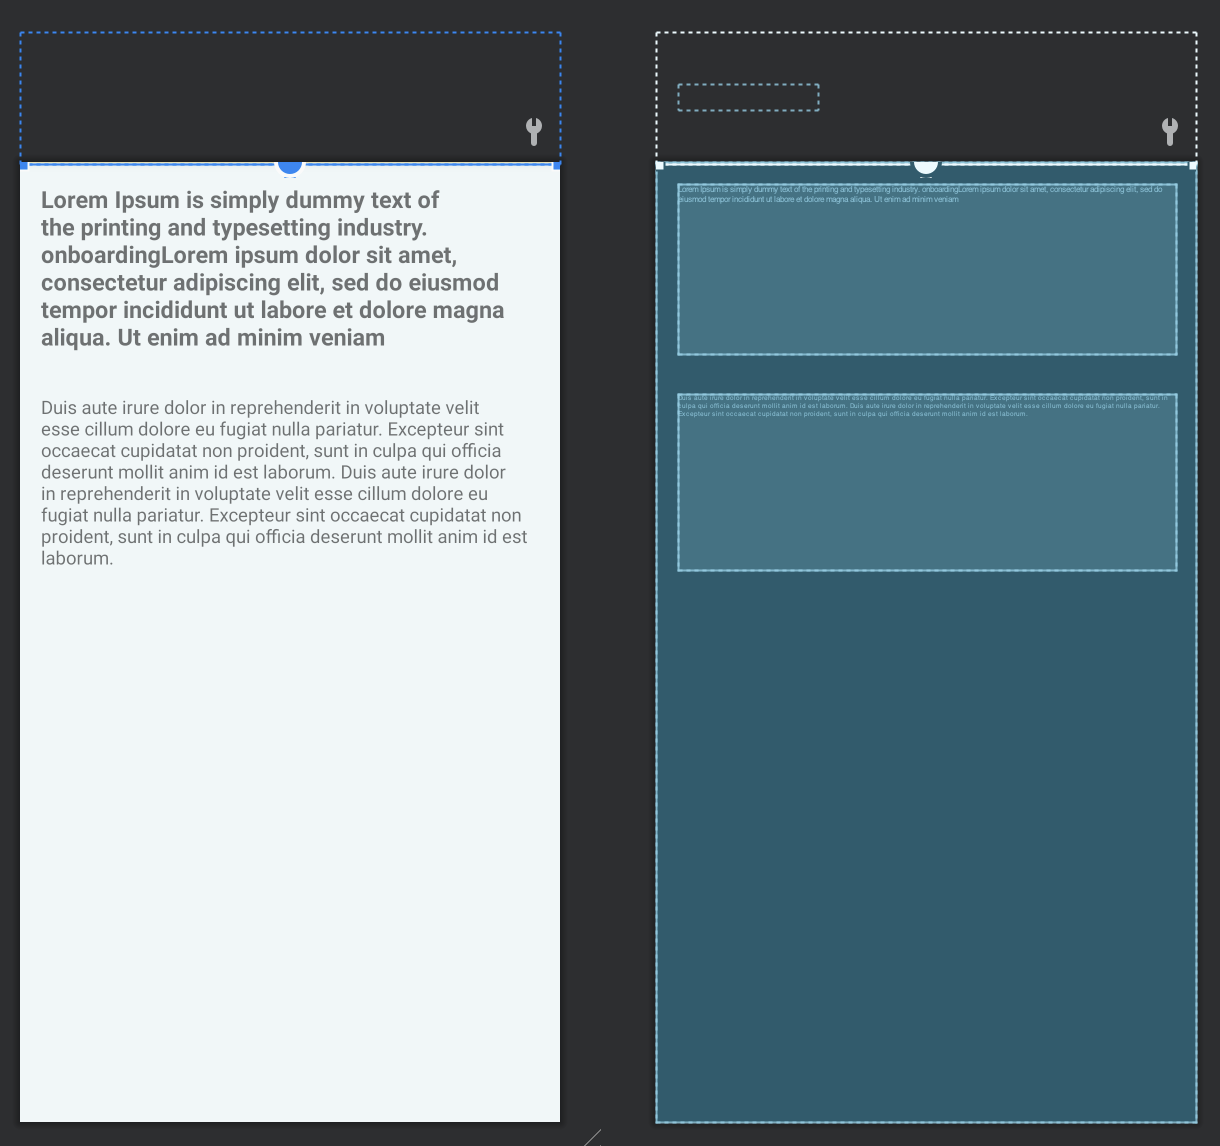
Initially, we pin the top of the banner (CardView) to the top of the parent (ConstraintLayout): app:layout_constraintTop_toTopOf="parent"

Time to animate
When it’s time to animate, we’ll use Kotlin Coroutines to modify constraints of the banner to move it outside of the parent view in the following way:
Remove app:layout_constraintTop_toTopOf="parent"
Add app:layout_constraintBottom_toTopOf="parent"
Here are the steps in the code to accomplish this:
Create a new
ConstraintSetbased on a copy of the existingConstraintLayoutDefine constraints of the resulting cloned layout. In our case we want to:
Remove top constraint for the banner
And add bottom constraint on the banner to be the top of the parent
Define transition and duration of the animation. We could add a lot more customization to that.
Begin transition animation
Here is the actual code perform those steps (clone, connect and clear of the ConstraintSet are the major APIs to understand in this case):
import android.os.Bundle
import android.view.View
import android.view.animation.AccelerateDecelerateInterpolator
import androidx.constraintlayout.widget.ConstraintSet
import androidx.fragment.app.Fragment
import androidx.lifecycle.lifecycleScope
import androidx.transition.AutoTransition
import androidx.transition.TransitionManager
import io.valueof.constraintlayoutanimation.R
import io.valueof.constraintlayoutanimation.databinding.MainFragmentBinding
import kotlinx.coroutines.delay

private const val BANNER_ANIMATION_DELAY = 1000L
private const val BANNER_ANIMATION_DURATION = 800L

class MainFragment : Fragment(R.layout.main_fragment) {

  override fun onViewCreated(view: View, savedInstanceState: Bundle?) {
    super.onViewCreated(view, savedInstanceState)

    val binding = MainFragmentBinding.bind(view)

    val animateBannerUpConstraintSet = ConstraintSet().apply {
      clone(binding.constraintLayout)
      connect(
        binding.animatedBanner.id,
        ConstraintSet.BOTTOM,
        ConstraintSet.PARENT_ID,
        ConstraintSet.TOP,
        0
      )
      clear(binding.animatedBanner.id, ConstraintSet.TOP)
    }

    viewLifecycleOwner.lifecycleScope.launchWhenResumed {
      delay(BANNER_ANIMATION_DELAY)
      val transition = AutoTransition().apply {
        interpolator = AccelerateDecelerateInterpolator()
        duration = BANNER_ANIMATION_DURATION
      }

      TransitionManager.beginDelayedTransition(binding.constraintLayout, transition)
      animateBannerUpConstraintSet.applyTo(binding.constraintLayout)
    }
  }
}
The most interesting part is the following block:
    val animateBannerUpConstraintSet = ConstraintSet().apply {
      clone(binding.constraintLayout)
      connect(
        binding.animatedBanner.id,
        ConstraintSet.BOTTOM,
        ConstraintSet.PARENT_ID,
        ConstraintSet.TOP,
        0
      )
      clear(binding.animatedBanner.id, ConstraintSet.TOP)
    }
where we set up the following:
clone the starting point layout to be used as the end point layout
add a new constraint in the resulting layout (banner’s bottom to parent’s top)
remove existing constraint (banner’s top to parent’s top)
Note that instead of doing it programmatically, we could also do it by duplicating the layout and modifying it. In this case, I chose not to do it since there would just be a one line difference in this entire layout:
Remove app:layout_constraintTop_toTopOf="parent"
Add app:layout_constraintBottom_toTopOf="parent"
You can see the repo with this code in https://github.com/jshvarts/ConstraintLayoutAnimationDemo